Cart
How to Sound Deaden a Car
So you want to know how to sound deaden your car? First, you need to determine your budget and goals. Sometimes the term 'car sound deadening' is used quite loosely and while most people are referring to noise reduction in a car; some might also be referring to car thermal insulation. However, we're going to primarily focus on reducing noise in a car for the purpose of this article.
We like to think sound deadening your car is as easy as 1-2-3:
Step 1: Damplifier Pro
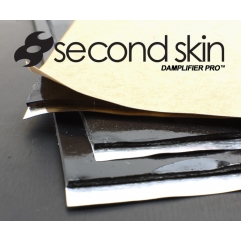
- Kills Vibrations, Heat & Noise
- Easy Peel & Stick Application
- The Industry's Thickest Foil
- Highest Heat Rating Available
Step 2: Luxury Liner Pro
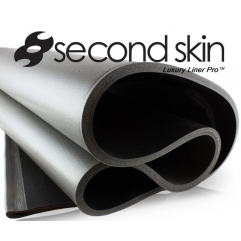
- Blocks Air Borne Sound Waves
- Reduces Heat Transfer
- Creates Luxury Car Silence
- Contact Adhesive Recommended
Step 3: Spectrum
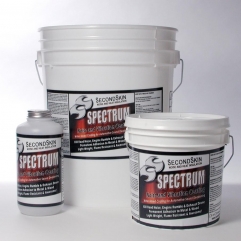
- Kills Road, Engine & Exhaust Noise
- Mineral Loaded Acrylic Coating
- Spray, Brush, Roll On or Apply as Paste
- Cleans Up With Water
However, there's more to it in reality - so here's a detailed breakdown to sound deadening your car.
The first acoustical problem in any sound deadening project is structure borne noise. This is the harmonics and resonance that is emitted from the cars sheet metal panels, similar to a wind chime. Unlike wind chimes however, our cars are not tuned to any specific musical frequency, so what we end up hearing is the road noise, engine rumble and exhaust drone.
You will especially notice this on the bigger vehicles like 4x4’s, minibuses and vans that have larger panels and subsequently, more “vibration noise”. Also, generally speaking, you will see that engines that have a bigger capacity or more cylinders will also have a bigger issue with structure borne noise. Though large capacity or more cylinders aren't always the case. One of our company show cars is only a 2 liter - 4 cylinder engine, however – our aftermarket engine mounts are rock hard and so before treatment, transmitted everything throughout the car and structure borne noise was a big issue because of this.
So the very first issue to tackle is vibrations and we do this with vibration dampers. When people refer to 'sound deadening' - they are 9 times out of 10 referring to vibration dampening sheets. Our best vibration damper is Damplifier Pro. Not only will applying Damplifier Pro greatly reduce the noise, but it’s also a great thermal insulator and you should see a big difference with Damplifier Pro alone in most car noise reduction projects.
If you want to further reduce the noise in the cabin of your vehicle, you may also want to apply some Spectrum to the floor (exterior/under-carriage) of your vehicle. Spectrum / Sludge is a very durable product and is designed to be use on places where Damplifier Pro just wouldn’t be able to go or be installed easily such as the exterior floor pan, wheel wells, etc. Spectrum is very convenient as it can be painted on with a brush or sprayed on with a spray gun. If you use our Spectrum Activator, you can turn your Spectrum into Spectrum Sludge and that becomes a peanut butter consistency for a putty like application. Spectrum will help reduce heat to a small degree but is not specifically designed to do so – so if you are getting a lot of heat from your new exhaust (or engine)– you may consider placing some Thermal Block above the exhaust in the “exhaust tunnel” (or engine bay for engine heat) to deflect such heat.
Lastly – after having attacked structure borne noise / vibrations, you want to get rid of the airborne noise. To fully reduce road, engine and exhaust noise, we suggest the use of a noise barrier like Luxury Liner Pro on top of your Damplifier Pro. Luxury Liner Pro is our best automotive noise barrier which you would apply on the floor of your car to help stop the noise coming from your exhaust and other airborne noise (tyre noise, etc.).
So just to recap and in terms of ‘order of importance’, I would definitely suggest doing the Damplifier Pro in the interior first followed by a layer of Luxury Liner Pro. Keep in mind that most doors have both an inner and outer layer, so double up your measurements there. Lastly, you can consider the Spectrum for the exterior of your vehicle if your budget allows. Spectrum can always be done later though, whereas if you are going to have your interior taken out – we would recommend doing the Damplifier Pro and Luxury Liner Pro in one go so that you don’t have to take out the interior multiple times.
In regards to quantities that you will need, you can look at the "Specifications" tab on all our various product pages. They list the dimensions of the various products (and other technical information) and you can then measure out your vehicle (don’t forget to double up the doors!) to determine the quantities of each product you will need. If you need assistance with this step, be sure to contact us and let us know your vehicle make, year and model and what your goals are so we can help you determine the quantities and products you will need.